A Comprehensive Guide to Sitecore XM Cloud Developer Certification Exam (Part 2).

In this blog post I will explain you the last 4 competencies to pass XM Cloud Developer Certification.

Competency 5: Sitecore API and WebHooks

Becoming certified in Sitecore XM Cloud requires a solid understanding of handling webhooks and utilizing the power of Sitecore APIs. Here’s what you need to know:

Experience Edge API Mastery

  • Query items, layouts, or conduct searches with finesse.

GraphQL Mutations Unleashed

  • Harness GraphQL Mutations to effortlessly create, update, and delete items.

Webhooks Wisdom

  • Define and handle webhooks seamlessly to enhance your Sitecore development prowess.

Resources to Explore:

Competency 6: XM Cloud Pages

In this competency, a developer must be adept at crafting, editing, and publishing page designs and components using Sitecore Pages. Here’s the breakdown:

Mastering Sitecore Pages

  • Create and edit items efficiently through Sitecore Pages.
  • Skillfully add and modify components along with their properties.
  • Seamlessly integrate components into placeholders.

Component Nuances

  • Understand the distinctions between Front End as a Service components and Headless SXA Components.
  • Master adding and changing a component’s data source.
  • Fine-tune a component’s Grid layout settings to perfection.

Workflow Magic

  • Utilize workflow to publish content seamlessly.
  • Preview a page on multiple devices for a flawless user experience.

Resources to Explore:

Competency 7: Security for Developers

Security is paramount for any developer, and achieving Sitecore XM Cloud certification requires mastery in configuring environment and user security settings. Here’s the roadmap:

Sitecore Cloud Portal Navigation

  • Create users effortlessly in the Sitecore Cloud Portal.

Role Management

  • Configure and assign roles seamlessly in the Sitecore XM Cloud Role Manager.

Permissions Perfection

  • Master the art of managing permissions for items, roles, and users.
  • Configure multifactor authentication for enhanced security.

Resources to Explore:

Competency 8: Data Modeling

To achieve Sitecore XM Cloud certification, a developer needs to demonstrate proficiency in data modeling. Here’s the roadmap:

Template Mastery

  • Create data templates, standard values, and set inset options aligned with the development plan.
  • Configure base templates seamlessly.

Field Fine-tuning

  • Create fields on a data template like a pro.

Version Control

  • Manage language and numbered versions of items effortlessly.

Schema Mapping

  • Understand Data Model mapping to Experience Edge Schema.

Resources to Explore:

By mastering these competencies, you pave the way to becoming a certified Sitecore XM Cloud developer, equipped with the skills to navigate the intricacies of APIs, Pages, Security, and Data Modeling. Happy coding!

A Comprehensive Guide to Sitecore XM Cloud Developer Certification Exam (Part 1).

Sitecore announced the release of the XM Cloud Developer Certification Exam. In the first blogpost I will present just the first 4 competencies, we’ll delve into the specifics of the Sitecore XM Cloud Developer Certification Exam, covering its format, competencies, and important details you should be aware of.

Understanding the Sitecore XM Cloud Developer Certification Exam

Exam Format

The Sitecore XM Cloud Developer Certification Exam consists of 50 multiple-choice and multiple-answer questions, which you will complete via Kryterion Webassessor. These questions are designed to evaluate your fundamental knowledge and skills in developing Sitecore XM Cloud solutions.

Competencies Tested

The exam is structured to assess your proficiency in various key competencies essential for a Sitecore XM Cloud Developer. These competencies are as follows:

  1. XM Cloud Architecture and Developer Workflow – 12%
  2. Deployment of XM Cloud Projects – 16%
  3. Renderings and Layout – 14%
  4. Sitecore Content Serialization – 14%
  5. Sitecore APIs & Webhooks – 10%
  6. XM Cloud Pages – 10%
  7. Security for Developers – 10%
  8. Data Modeling – 14%

These competencies are integral to developing robust and effective solutions within the Sitecore XM Cloud environment.

Important Details

In addition to understanding the exam format and competencies, here are some crucial details to keep in mind as you prepare for the Sitecore XM Cloud Developer Certification Exam:

  • Exam Platform: You will take the exam via Kryterion Webassessor, an online assessment platform.
  • Question Types: The exam includes both multiple-choice and multiple-answer questions, so be prepared to provide the most accurate answers.
  • Content Coverage: Make sure to cover all the competencies as outlined in the provided percentages. This ensures a well-rounded understanding of Sitecore XM Cloud development.
  • Preparation Resources: Utilize official Sitecore documentation, training materials, and practice exams to prepare effectively.
  • Time Management: Manage your time wisely during the exam to ensure you have sufficient time to address each question.
  • Stay Updated: Keep abreast of the latest developments in Sitecore XM Cloud, as the platform evolves continuously.

Competency 1: XM Cloud Architecture and Developer Workflow

To be certified in Sitecore XM Cloud, a Developer should be able to describe the developer workflow and manage the architecture of XM Cloud. To meet this competency, you should be able to:  

  • Define Sitecore XM Cloud-specific terminology 
  • Describe the benefits of cloud and SaaS architecture for composable DXP foundations
  • Define key components within the developer workflow for XM Cloud 
  • Manage sites within site collections

To prepare for this competency, candidates can use the provided resources, which include links to XM Cloud terminology, Sitecore-first development workflow, code-first development workflow, and site collections.

Competency 2: Deployment of XM Cloud Projects

The second competency for Sitecore XM Cloud certification focuses on deploying new projects using both the Deploy Application and Sitecore CLI. Let’s break down the key points outlined in this competency:

  1. Log into and Navigate the XM Cloud Deploy Application: Candidates should be able to log in to the XM Cloud Deploy Application and navigate through its interface. This involves understanding the layout, features, and functionalities of the application.
  2. Deploy a Project Using a Starter Template: This requires developers to deploy a new project using a starter template provided by XM Cloud. Starter templates are preconfigured project setups that can help jumpstart development.
  3. Set Up an XM Cloud Local Development Environment: Candidates need to know how to set up a local development environment for Sitecore XM Cloud. This may include installing necessary tools and configuring the environment for development.
  4. Define the Attributes of a Starter Template: Understanding the attributes of a starter template involves knowing the key settings, configurations, and components included in the template.
  5. Deploy a Project Using Source Code Provider: This part of the competency assesses a developer’s ability to deploy a project using source code. Source code provider integration is essential for version control and continuous integration/delivery.
  6. Define Compatibility Requirements for Deploying Your Own Code: Developers should know what compatibility requirements are necessary when deploying their own custom code to Sitecore XM Cloud. This could include ensuring compatibility with the XM Cloud platform and other dependencies.
  7. Configure Repositories and Environments: Candidates should be able to configure repositories where source code is stored and create different environments for various stages, such as production, QA, and testing.
  8. Connect to Your Repository:This involves understanding how to connect to source code repositories, which are essential for version control and collaboration among team members.
  9. Create Environments Such as Production, QA, and Test: Developers need to know how to set up different environments for various stages of development and testing. Each environment may have different configurations and purposes.
  10. Configure Deploys On-Demand or Automatically Based on Code Commits to a Watched Branch: Developers should be able to configure deployment options, whether manually triggered or automatically triggered based on code commits to a watched branch in the source code repository.
  11. Review Project Details to Determine Deployment Status: Developers need to understand how to review project details within the XM Cloud Deploy Application to determine the status of deployments. This is crucial for tracking progress and ensuring that deployments are successful.
  12. Review Logs to Troubleshoot Errors:
    • Troubleshooting is a critical skill. Developers should be able to review deployment logs and identify and resolve errors that may occur during the deployment process.

Resources:

Competency 3: Renderings and Layout

The third competency for Sitecore XM Cloud certification focuses on creating and managing components within the Sitecore XM environment. Let’s break down the key points mentioned in this competency:

  1. Create New Components Using the Component Builder: Developers should be able to create new components using the Component Builder. This tool helps in building and customizing various components for your Sitecore XM site.
  2. Create Placeholder Settings Items and Set Allowed Controls: Candidates need to understand how to create placeholder settings items and configure which components can be placed within those placeholders. This allows for control over the types of content that can be added to specific areas of a page.
  3. Create and Manage Page Designs and Partial Designs: Developers should know how to create and manage Page Designs and Partial Designs. These are essential for structuring the layout and design of pages within your site.
  4. Create a Custom SXA Module: This competency assesses a developer’s ability to create custom Sitecore Experience Accelerator (SXA) modules, which can extend the functionality and design of your website.
  5. Create Component Definition Items: Developers should understand how to create component definition items, which define the properties and behavior of components. This is crucial for consistent rendering across the site.
  6. Set Compatible Renderings on a Rendering Definition Item: Candidates need to configure compatible renderings for rendering definition items. This allows for flexibility in choosing the rendering components to use for a particular rendering definition.
  7. Set the Datasource Location and Data Source Template Fields: Developers should be able to specify the location from which data sources are retrieved for components and define the data source template fields. This is important for dynamic content retrieval.
  8. Set Up Rendering Parameters: This competency requires understanding how to set up rendering parameters for components. Rendering parameters allow for additional customization and configuration of components.
  9. Clone a Rendering: Developers should know how to create clones of existing renderings. Cloning can save time when creating similar components with slight variations.
  10. Create and Manage Headless Variants: Headless variants are important for decoupled or headless Sitecore implementations. Developers should be able to create and manage headless variants for components.
  11. Configure Item Security Properly for Existing and Future Items: Understanding and configuring item security is essential to ensure that only authorized users have access to specific items. Developers should be able to manage item security effectively for both existing and future items.

Resources:

Competency 4: Sitecore Content Serialization

Competency 4 for the Sitecore XM Cloud certification focuses on using Sitecore Content Serialization (SCS) to manage content and item changes within a team of developers. Here’s an explanation of the key points outlined in this competency:

  1. Serialize and Deserialize Items from Source Control Using the Sitecore CLI: Developers should be able to use the Sitecore CLI to serialize items, meaning they export Sitecore content items to a format that can be managed in source control. They should also know how to deserialize items, which involves importing content items from source control back into a Sitecore instance.
  2. Connect to a Local or Remote XM Cloud Hosted Instance: Understanding how to connect to both local and remote Sitecore XM Cloud instances is essential for managing content and item changes across different environments.
  3. Configure a Serialization Module with Included Paths and Rules: Developers should be able to configure a Serialization Module with specific paths and rules. This allows for selective serialization of content items and ensures that only the required items are included in the serialization process.
  4. Use Serialization Packages for Continuous Integration: Serialization packages are bundles of serialized items that can be used for continuous integration. Developers should understand how to create and use these packages as part of their development workflow, ensuring that changes made by the team can be easily integrated and deployed.

Competency in Sitecore Content Serialization (SCS) is crucial for collaborative development in Sitecore XM Cloud, enabling multiple developers to work on content and item changes simultaneously and ensuring that these changes are properly versioned and managed. The Sitecore CLI and Serialization Modules are essential tools in achieving this goal.

Sitecore JSS App Logging

In this blog post, we’ll explore the essential aspects of debug logging in Sitecore JSS apps. By the end of this article, you’ll have a clear understanding of how to leverage debug logging to diagnose and fix issues in your JSS applications.

Understanding the Debug Module

Sitecore JSS applications rely on NPM packages and code samples that use the debug module for handling debugging information. The debug module exposes the debug() function, which is an enhanced version of console.log() statements. What makes it particularly useful is that you don’t need to remove or comment out debug() calls in production code. This means you can enable debug logs in production when necessary by using environment variables, without affecting your production environment adversely.

Enabling Debug Logging

All Sitecore JSS logs are organized under the root namespace sitecore-jss. However, by default, logging is turned off. You can conditionally turn it on by using the DEBUG environment variable. This allows you to be in control of when and where debugging information is displayed, ensuring that it doesn’t clutter your production logs.

To enable all debug logs, set the DEBUG environment variable as follows:

DEBUG=sitecore-jss:*

The asterisk (*) serves as a wildcard, capturing all available logs. But what if you want to be more selective and display only a specific category of log messages? You can do that too. For example, to show only layout service logs, you can set the DEBUG environment variable like this:

DEBUG=sitecore-jss:layout

Conversely, if you want to show all logs except the layout service ones, you can use the “-” prefix:

DEBUG=sitecore-jss:*,-sitecore-jss:layout

Available Debugging Namespaces

In Sitecore JSS, debugging is organized into various namespaces, each catering to specific functionalities and components. Let’s take a look at some of the critical namespaces and their associated NPM packages and sample applications:

  1. sitecore-jss:http
    • Package(s)/Sample App(s): sitecore-jss, nextjs
    • Description: Provides HTTP request and response logging for default fetch wrappers like GraphQLRequestClient and AxiosDataFetcher.
  2. sitecore-jss:dictionary
    • Package(s)/Sample App(s): sitecore-jss, nextjs, node-headless-ssr-experience-edge
    • Description: Offers trace logging for dictionary service implementations, such as GraphQLDictionaryService and RestDictionaryService.
  3. sitecore-jss:layout
    • Package(s)/Sample App(s): sitecore-jss, nextjs, node-headless-ssr-experience-edge
    • Description: Provides trace logging for layout service implementations, including GraphQLLayoutService and RestLayoutService.
  4. sitecore-jss:editing
    • Package(s)/Sample App(s): sitecore-jss-nextjs, nextjs
    • Description: Offers trace logging for Next.js middleware used for Sitecore editor integration.
  5. sitecore-jss:sitemap
    • Package(s)/Sample App(s): sitecore-jss-nextjs, nextjs
    • Description: Provides trace logging for Next.js GraphQL sitemap service (GraphQLSitemapService).

Advanced Debugging Options

When running Sitecore JSS applications through Node.js, you can further customize the behavior of debug logging by utilizing additional environment variables:

  • DEBUG: Enables or disables specific debugging namespaces.
  • DEBUG_HIDE_DATE: Hides the date from debug output (non-TTY). The default value is false.
  • DEBUG_COLORS: Specifies whether to use colors in the debug output. The default value is true.
  • DEBUG_DEPTH: Sets the object inspection depth. The default value is 2.
  • DEBUG_MULTILINE: Controls whether inspected objects are pretty-printed on multiple lines. The default is false (single line).
  • DEBUG_SHOW_HIDDEN: Determines whether to show hidden properties on inspected objects. The default is false.

Debug logging is an invaluable tool when developing and maintaining Sitecore JSS applications. It allows you to efficiently diagnose issues, monitor specific components, and improve the overall stability of your application. By understanding how to enable and configure debug logging, you can make your development and debugging process smoother and more effective. So, the next time you find yourself in need of debugging assistance in your Sitecore JSS project, don’t forget to leverage the power of debug logging.

Page not found in Sitecore Headless Next.js

All the examples I found with Sitecore Headless Next.js use a static 404 page.

When a new Next.js app is create a default 404 Page file is created. This file is statically generated at build time.

import NotFound from 'src/NotFound';

const Custom404 = (): JSX.Element => <NotFound />;

export default Custom404;

If we want to customize the 404 page, we have to use getStaticProps to fetch data at build time.

In my example I will use Sitecore Basic Company Example : https://github.com/Sitecore/Helix.Examples/tree/master/examples/helix-basic-nextjs

To customize the 404 page first time we need to create a 404 page inside Sitecore.

Template and 404 page were created in Sitecore, and components were added to the rendering. The page will look like below picture.

To fetch data during build time in Sitecore we have to customize 404.tsx file.

Inside 404.tsx we need to fetch data from _404 error page.

import { SitecorePageProps } from 'lib/page-props'
import { sitecorePagePropsFactory } from 'lib/page-props-factory'
import { GetStaticProps } from 'next'

import SitecorePage from './[[...path]]'

export const getStaticProps: GetStaticProps = async (context) => {
  let props = { notFound: false }
    props = await sitecorePagePropsFactory.create({
      ...context,
      params: { ...context.params, path: '/_404' },
    })
  
  return {
    props,
    // Next.js will attempt to re-generate the page:
    // - When a request comes in
    // - At most once every 5 seconds
    revalidate: 5, // In seconds
    notFound: props.notFound, // Returns custom 404 page with a status code of 404 when true
  }
}

export default function Custom404Page({
  notFound,
  layoutData,
  componentProps,
  navigation
}: SitecorePageProps): JSX.Element {
  return (
    <SitecorePage
      notFound={notFound}
      layoutData={layoutData}
      componentProps={componentProps}
      navigation={navigation}
      dictionary={{}}
      locale=""
    />
  )
}

The SitecorePagePropsFactory class uses an instance of the ComponentPropsService class that helps to identify which components require retrieval of data. The ComponentPropsService is provided by the NPM package @sitecore-jss/sitecore-jss-nextjs.

The ComponentPropsService

The ComponentPropsService accepts the following parameters:

componentModule – a function returning a Next.js component using the componentName argument. You can find the componentModule function definition in the file src/temp/componentFactory. If not present, generate it by running scripts/bootstrap.ts.

layoutData – Layout Service data for your page.

context – The Next.js SSG or SSR context.

The 404 page in Next.js will be:

Sitecore SXA- add Referrers rendering variant

In Sitecore SXA already exist a Reference rendering variant which lets you display fields from a referenced item.

For the reference rendering variant If you want to display a field from a referenced item, you can define this field in the “Pass through field” field.

To display fields from referrers items we need to create a custom Referrer Rendering Variant.

First thing we need to create a template for Referrers Rendering Variant which should inherit from “_Rendering Variants Base” and “_Variant Paging”

We need to create the model for this template.

 public class VariantReferrers : BaseVariantField
    {
        public int? MaxNumberOfResults { get; set; }
        public int? NumberOfResultsToSkip { get; set; }
        public IEnumerable<BaseVariantField> Items { get; set; }
        public string RefferItemTemplateName { get; set; }
    }

To create the VariatReferrers model we need to create it inside a class which inherits from ParseVariantFieldProcessor and to render it we need to create a class which interits from RenderRenderingVariantFieldProcessor

 public class ParseReferrers : ParseVariantFieldProcessor
    {
        
        public override ID SupportedTemplateId => Templates.VariantReferrers.ID;

        public override void TranslateField(ParseVariantFieldArgs args)
        {
            var obj = new VariantReferrers
            {
                ItemName = args.VariantItem.Name,
                RefferItemTemplateName = args.VariantItem[Templates.VariantReferrers.Fields.TemplatesAllowed]
            };
            IList<BaseVariantField> items;
            if (args.VariantItem.Children.Count <= 0)
            {
                IList<BaseVariantField> list = new List<BaseVariantField>();
                items = list;
            }
            else
            {
                items = ServiceLocator.ServiceProvider.GetService<IVariantFieldParser>()
                    .ParseVariantFields(args.VariantItem, args.VariantRootItem, false);
            }

            obj.Items = items;
            args.TranslatedField = obj;
            if (int.TryParse(args.VariantItem[Sitecore.XA.Foundation.RenderingVariants.Templates._VariantPaging.Fields.MaxNumberOfResults], out var result))
                (args.TranslatedField as VariantReferrers).MaxNumberOfResults = result;
            if (int.TryParse(args.VariantItem[Sitecore.XA.Foundation.RenderingVariants.Templates._VariantPaging.Fields.NumberOfResultsToSkip], out var result2))
                (args.TranslatedField as VariantReferrers).NumberOfResultsToSkip = result2;
        }
    }

SupportedTemplateId propery represents the ID of the template created above.

Inside TranslatedField method we set the RefferItemTemplateName property with the value from rendering variant.

On RenderReferrers class , inside method RenderField is the logic to get the referrers of current item and we filter refferes item by templatename.

 public class RenderReferrers : RenderVariantFieldProcessor
    {
        public override Type SupportedType => typeof(VariantReferrers);

        public override RendererMode RendererMode => RendererMode.Html;


		public override void RenderField(RenderVariantFieldArgs args)
		{
			VariantReferrers variantReferrers = args.VariantField as VariantReferrers;
			if (string.IsNullOrWhiteSpace(variantReferrers?.RefferItemTemplateName) || !variantReferrers.Items.Any())
			{
				return;
			}
			List<Item> targetItems = GetReffererItems(args, variantReferrers);

			if (!targetItems.Any())
			{
				return;
			}
			Control control = new PlaceHolder();
			foreach (Item item in targetItems)
			{
				foreach (BaseVariantField referencedItem in variantReferrers.Items)
				{
					RenderVariantFieldArgs renderVariantFieldArgs = new RenderVariantFieldArgs
					{
						VariantField = referencedItem,
						Item = item,
						HtmlHelper = args.HtmlHelper,
						IsControlEditable = args.IsControlEditable,
						IsFromComposite = args.IsFromComposite,
						RendererMode = args.RendererMode,
						Model = args.Model
					};
					base.PipelineManager.Run("renderVariantField", renderVariantFieldArgs);
					if (renderVariantFieldArgs.ResultControl != null)
					{
						control.Controls.Add(renderVariantFieldArgs.ResultControl);
					}
				}
			}
			args.ResultControl = control;
			args.Result = RenderControl(args.ResultControl);
		}

        protected  List<Item> GetReffererItems(
            RenderVariantFieldArgs args,
            VariantReferrers variantReferrers)
        {
            var currentItem = args.Item;
			var links= Globals.LinkDatabase.GetReferrers(currentItem);
            var originalSource = links.Select(i => i.GetSourceItem()).Where(i => i != null&& i.TemplateName.Equals(variantReferrers.RefferItemTemplateName));

            if (variantReferrers.NumberOfResultsToSkip.HasValue)
                originalSource = originalSource.Skip<Item>(variantReferrers.NumberOfResultsToSkip.Value);
            int? maxNumberOfResults = variantReferrers.MaxNumberOfResults;
            if (maxNumberOfResults.HasValue)
            {
                IEnumerable<Item> source2 = originalSource;
                maxNumberOfResults = variantReferrers.MaxNumberOfResults;
                int count = maxNumberOfResults.Value;
                originalSource = source2.Take<Item>(count);
            }
            return originalSource.ToList<Item>();
        }
    }

We need to register these 2 processors in a config file:

<?xml version="1.0"?>

<configuration xmlns:patch="http://www.sitecore.net/xmlconfig/" xmlns:role="http://www.sitecore.net/xmlconfig/role/">
	<sitecore>
		<pipelines>
			<parseVariantFields>
				<processor type="XA.Reference.Foundation.RenderingVariants.Pipelines.ParseVariantFields.ParseReferrers, XA.Reference.Foundation.RenderingVariants" />
			</parseVariantFields>
			<renderVariantField>
				<processor type="XA.Reference.Foundation.RenderingVariants.Pipelines.ParseVariantFields.RenderReferrers, XA.Reference.Foundation.RenderingVariants" />
			</renderVariantField>
		</pipelines>
	</sitecore>
</configuration>

How to debug Sitecore 10 .Net Core Rendering Host


First off all you need to install Sitecore 10 using Docker. You can follow this example.

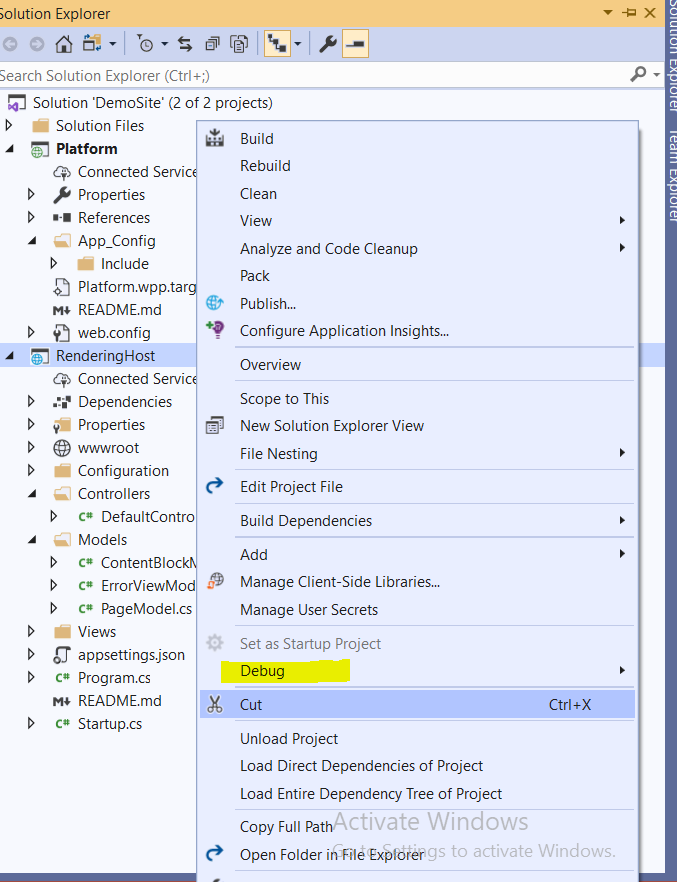
To debug Sitecore 10 .Net Core Rendering Host are two ways:

  1. Using Visual Studio Container Tools 

      If you have Visual Studio 2019 version 16.4 or later, you can use the Containers window to view running containers on your machine, as well as images that you have available.

Open the Containers window by using the search box in the IDE (press Ctrl+Q to use it), type in container, and choose the Containers window from the list.

You need to right click on Rendering container , right click and choose “Attach to Process

Select the .NET Rendering Host process ( exe file) .

2. The second way to do it , is to run and to debug directly from Visual Studio

In Solution Explorer select the Rendering Host project , right click and select Debug

Select Start New Instance.

And the Rendering Host will run on the browser.

Happy Sitecoring with Docker!

View Sitecore xConnect logs in Log2Console

Few days ago I blogged about how to view Commerce logs in Log2Console.

I searched a little bit how to  view  xConnect logs in real time, but I didn’t find any article how to add a custom serilog sink.

I made a small research and here is there solution:

To view xConnect logs in Log2Console you need to follow next steps :

  1. Add Serilog.Sinks.UDP.dll and Serilog.Sinks.PeriodicBatching.dll to your xConnect bin folder . (https://github.com/FantasticFiasco/serilog-sinks-udp-sample-dotnet-framework)
  2.  Add a new Serilog configuration  into :     yourxConnectfolder\App_Data\Config\Sitecore\CoreServices and name it : sc.Serilog.Udp.xml where you set the remoteAddress and remotePort:


<?xml version="1.0" encoding="utf-8"?>
<Settings>
<Serilog>
<Using>
<UDPSinkAssembly>Serilog.Sinks.Udp</UDPSinkAssembly>
</Using>
<WriteTo>
<Udp>
<Name>Udp</Name>
<Args>
<remoteAddress>localhost</remoteAddress>
<remotePort>7071</remotePort>
</Args>
</Udp>
</WriteTo>
</Serilog>
</Settings>

3. To view xconnect logs from AutomationEngine, IndexWorker and ProcessEngine you need to copy above file  to the CoreServices folder (example  for IndexWorker : c:\inetpub\wwwroot\xconnectFolder\App_Data\jobs\continuous\IndexWorker\App_Data\config\sitecore\CoreServices\ )

4. Check log2console (I already setup the receivers)

log2consoleXconnect.PNG

Sitecore Commerce logviewing using Log2Console

To view Sitecore logs in Log2Console is pretty easy. Sitecore  Platform is using log4net and you can add an UdpAppender for logging in an external application.

On few blogs is described how to do it:

  1. http://blog.jan.hebnes.dk/2015/12/hackthedot-sitecore-logviewing-made.html
  2. https://community.sitecore.net/developers/f/8/t/136 ( few people described different tools for sitecore logs)
  3. https://publications.soulcode.agency/you-dont-monitor-your-local-sitecore-instance-close-enough/

Sitecore Commerce is a .NET Core application, and is using Serilog for log messages.

We will use an external nuget package to send UDP package over the network: https://github.com/FantasticFiasco/serilog-sinks-udp

To view the commerce logs in Log2Console we need to follow next steps:

  1. Add a settings in commerce config.json to enable/disable sending UDP packages over the network.

writetoudp2.JPG

2. Add reference to Serilog.Sinks.Udp nuget package

nugetpackage.JPG

3. Modify commerce engine to use Serilog.Sink.Udp

The UDP packages are sent on port 7071.

At the end of Startup.cs add next code:

var writeToUdp = false;

//check if writotoUdp is enabled
if (bool.TryParse(Configuration.GetSection(“Serilog:WritetoUDP”).Value, out writeToUdp))
{
if (writeToUdp)
Log.Logger = new LoggerConfiguration()
.WriteTo.Sink((ILogEventSink)Log.Logger)
.WriteTo.Udp(“localhost”, 7071, System.Net.Sockets.AddressFamily.InterNetwork)
.CreateLogger();
}

4. Add a log2console receiver, it will work on port 7071.

log2consoleReceiver.JPG

and commerce logs will appear on Log2console

log2consoleLogs.JPG

Extend Commerce Entity Views

To extend commerce entity view you need to have a look on Commerce Views service

The Commerce Views service is provided by the Sitecore.Commerce.Plugin.Views
plugin.

Commerce views are also designed to feed directly into a dynamic data-driven business tool experience. You can activate, extend, or remove functionality in the business tools through custom-developed plugins, without having to modify the out-of-box plugins or modify the source code of the business tools themselves. This approach dramatically improves upgradability.

In the Sitecore Commerce architecture, this view layer is provided on the server side, instead of the client side.In this way you don’t need to have frontend knowledge. This allows standard Commerce plugins to extend existing views and add new views.

Commerce views are exposed via the Authoring API. This Authoring API is based on OData.

The EntityView is the core Commerce artifact that supports views.

An EntityView represents a flattened, dynamic service response focused on supporting a dynamic user experience.

The EntityView provides a business user experience that is completely customizable and extensible. The EntityView allows the business user to take actions and dynamically updates the view without requiring significant intelligence or customization of the user experience itself.

The EntityView is a simple POCO class that provides a property bag. The EntityView can have child EntityViews. You can build out more complex views as needed.

A Composite EntityView includes a master view and child views.

The master view represents the overall page itself. It normally does not contain properties, but could. The master view contains a list of child views that each represent a section of the user interface. It also contains a list of actions that can be executed against the entity. An example of a child view is the Details section of a page. For example, on an Order page, the child view is the section that presents the order confirmation identifier, the date, and so on.

In the next example you will find how to add to sellable items  the first image from product “Images” field.


Add a policy where you keep the value of the CM server.


namespace Plugin.Demo.ExtendCommerceView.Policies
{
public class CMServerPolicy : Policy
{
public string ServerHostName { get; set; }
}
}

Add the policy to the PlugIn.Habitat.CommerceAuthoring-1.0.0.json .


{
"$type": "Plugin.Demo.ExtendCommerceView.Policies.CMServerPolicy,Plugin.Demo.ExtendCommerceView",
"ServerHostName": "http://xp0.sc/&quot;
}

Inject the pipeline block which extend the entitiy view after PopulateEntityViewActionsBlock :


using Microsoft.Extensions.DependencyInjection;
using System.Reflection;
namespace Plugin.Demo.ExtendCommerceView
{
using Sitecore.Commerce.Core;
using Sitecore.Commerce.EntityViews;
using Sitecore.Framework.Configuration;
using Sitecore.Framework.Pipelines.Definitions.Extensions;
/// <summary>
/// The configure sitecore class. This allows a Plugin to wire up new Pipelines or to change existing ones.
/// </summary>
public class ConfigureSitecore : IConfigureSitecore
{
/// <summary>
/// The configure services constructor.
/// </summary>
/// <param name="services">
/// The services.
/// </param>
public void ConfigureServices(IServiceCollection services)
{
var assembly = Assembly.GetExecutingAssembly();
services.RegisterAllPipelineBlocks(assembly);
services.Sitecore().Pipelines(config => config
.ConfigurePipeline<IFormatEntityViewPipeline>(d =>
{
d.Add<PopulateSellableItemImages>().After<PopulateEntityViewActionsBlock>();
})
);
services.RegisterAllCommands(assembly);
}
}
}

Implement the PopulateSellableItemImages pipelineblock:


namespace Plugin.Demo.ExtendCommerceView
{
using Plugin.Demo.ExtendCommerceView.Policies;
using Sitecore.Commerce.Core;
using Sitecore.Commerce.EntityViews;
using Sitecore.Commerce.Plugin.Catalog;
using Sitecore.Framework.Pipelines;
using System.Linq;
using System.Threading.Tasks;
[PipelineDisplayName("PopulateSellableItem")]
public class PopulateSellableItemImages : PipelineBlock<EntityView, EntityView, CommercePipelineExecutionContext>
{
private readonly CommerceCommander _commerceCommander;
public PopulateSellableItemImages(CommerceCommander commerceCommander)
{
this._commerceCommander = commerceCommander;
}
public override Task<EntityView> Run(EntityView entityView, CommercePipelineExecutionContext context)
{
if (entityView.EntityId.Contains("Entity-Category-"))
{
var currentEntityViewArgument = this._commerceCommander.Command<ViewCommander>().CurrentEntityViewArgument(context.CommerceContext);
//get the sellableitems section
var sellableItemsView = entityView.ChildViews.FirstOrDefault(p => p.Name == "SellableItems");
if (sellableItemsView != null)
{
var serverHostName = context.GetPolicy<CMServerPolicy>().ServerHostName;
// parse the sellableitems section
foreach (var currentsellableItem in (sellableItemsView as EntityView).ChildViews)
{
var currentsellableItemFoundEntity = context.CommerceContext.GetObjects<FoundEntity>().FirstOrDefault(p => p.EntityId == (currentsellableItem as EntityView).ItemId);
if (currentsellableItemFoundEntity != null)
{
var sellableItem = currentsellableItemFoundEntity.Entity as SellableItem;
if (sellableItem != null)
{
//get the images component
var imagesComponent = sellableItem.GetComponent<ImagesComponent>();
var defaultImage = imagesComponent.Images.FirstOrDefault().Replace("-","");
if (defaultImage != null)
{
(currentsellableItem as EntityView).Properties.Insert(1, new ViewProperty
{
Name = " ",
IsHidden = false,
IsReadOnly = true,
OriginalType = "Html",
UiType = "Html",
IsRequired = false,
Value = $"<img alt='' height=60 width=60 src='{serverHostName}-/media/{defaultImage}.ashx'/>",
});
}
}
}
}
}
}
return Task.FromResult(entityView);
}
}
}

view raw

gistfile1.txt

hosted with ❤ by GitHub


Commerce Computed Indexfield

Computed fields allow you to add entirely new fields in your search indexes, in addition to those of Sitecore.

To create a computed index field for commerce entities you need to follow next steps:

  1. Create your own class which inherits from : Sitecore.Commerce.Engine.Connect.Search.ComputedFields.BaseCommerceComputedField


using Newtonsoft.Json.Linq;
using Sitecore.Commerce;
using Sitecore.Commerce.Engine.Connect;
using Sitecore.Commerce.Engine.Connect.DataProvider;
using Sitecore.Commerce.Engine.Connect.Search.ComputedFields;
using Sitecore.ContentSearch;
using Sitecore.Data;
using Sitecore.Data.Items;
using System.Collections.Generic;
namespace Sitecore.CommerceDemo.Indexing.CommerceComputedIndexFields
{
public class ExampleComputedIndexField : BaseCommerceComputedField
{
private static readonly IEnumerable<ID> _validTemplates = new List<ID>
{
CommerceConstants.KnownTemplateIds.CommerceCatalogTemplate,
CommerceConstants.KnownTemplateIds.CommerceCategoryTemplate,
CommerceConstants.KnownTemplateIds.CommerceProductTemplate
};
protected override IEnumerable<ID> ValidTemplates
{
get
{
return _validTemplates;
}
}
public override object ComputeValue(IIndexable indexable)
{
Assert.ArgumentNotNull(indexable, "indexable");
Item item = indexable as SitecoreIndexableItem;
if (item == null)
{
return null;
}
Item validatedItem = base.GetValidatedItem(indexable);
if (validatedItem != null)
{
JToken entity = new CatalogRepository().GetEntity(validatedItem.ID.Guid.ToString(), null);
if (entity != null)
{
}
}
return null;
}
}
}

2. Customize the class to meet your particular needs.

The “JToken entity” object contains few information about your sellableitem (in the below example is a sellableitem from SXA)


{
"@odata.context": "https://localhost:5000/Api/$metadata#SellableItems/$entity&quot;,
"CompositeKey": null,
"CreatedBy": "sitecore\\Admin",
"UpdatedBy": "sitecore\\Admin",
"DateCreated": "2018-11-14T05:18:09.9239529Z",
"DateUpdated": "2018-11-14T05:17:44.2144901Z",
"DisplayName": "Studio X Over-the-Ear Wired Headphones",
"FriendlyId": "6042064",
"Id": "Entity-SellableItem-6042064",
"Version": 4,
"EntityVersion": 2,
"Published": false,
"IsPersisted": false,
"Name": "Studio X Over-the-Ear Wired Headphones",
"Policies": [
{
"@odata.type": "#Sitecore.Commerce.Plugin.Pricing.ListPricingPolicy",
"PolicyId": "d6e7c406ecb144cabbad6415bae23d26",
"Models": [],
"Prices": [
{
"CurrencyCode": "USD",
"Amount": 49.5
}
]
}
],
"SitecoreId": "2495594a-9914-4d13-9ffd-aff5484ac57c",
"CatalogToEntityList": null,
"ParentCatalogList": "59ddadc1-9b88-727e-9e14-3f6cf321ae0f",
"ParentCategoryList": "a0860c27-2a32-841f-7014-75b163b9471e|368aae84-008e-43a6-150f-826085a271ba|871c3b62-ce96-ad61-dabe-10db020f02c5|e5e9207c-58cd-0735-2a79-b5d2b199ea7a",
"ChildrenCategoryList": null,
"ChildrenSellableItemList": null,
"ItemVariations": null,
"Description": "The Studio X over-the-ear headphones delivery superb quality and design along with professional-grade sound. Its flexible headband brings you endless hours of comfort and is fully adjustable. This wired headphone has a wide frequency response, low distortion, and deep bass for all types of music and listening needs. ",
"ItemTemplate": null,
"ProductId": "6042064",
"Brand": "Studio X",
"Manufacturer": "",
"TypeOfGood": "",
"Tags": [
{
"Name": "over-the-ear",
"Policies": [],
"Excluded": false
},
{
"Name": "headphones",
"Policies": [],
"Excluded": false
},
{
"Name": "studiox",
"Policies": [],
"Excluded": false
},
{
"Name": "wired",
"Policies": [],
"Excluded": false
}
],
"ListPrice": null,
"Components": [
{
"@odata.type": "#Sitecore.Commerce.Plugin.Catalog.CatalogsComponent",
"Id": "80f9e1150e6a425d8a072b00f76dc127",
"Name": "",
"Comments": "",
"Policies": [],
"ChildComponents": [
{
"@odata.type": "#Sitecore.Commerce.Plugin.Catalog.CatalogComponent",
"Id": "4a38b5f02aa94fa492fe9def820c700f",
"Name": "Habitat_Master",
"Comments": "",
"Policies": [],
"CatalogLanguages": [],
"DefaultLanguage": null,
"ItemDefinition": "Headphones",
"ChildComponents": []
}
]
},
{
"@odata.type": "#Sitecore.Commerce.Plugin.Catalog.ImagesComponent",
"Id": "c0e48567d9324db58bb3a6ff244dff6c",
"Name": "",
"Comments": "",
"Policies": [],
"Images": [
"d2d12d06-341d-4ee8-b93e-fd6a963ff74f",
"bb5ca39d-2b41-452d-9bf4-e867adcaed8c",
"a2785fc9-0bd7-493d-ae2c-10ea5d55a3cd",
"2627453a-63d4-4907-9d62-aa9b902b9575"
],
"ChildComponents": []
},
{
"@odata.type": "#Sitecore.Commerce.Core.LocalizedEntityComponent",
"Id": "da9343a6568c49aeba0aa37d98adf420",
"Name": "",
"Comments": "",
"Policies": [],
"Entity": {
"Name": "",
"EntityTarget": "Entity-LocalizationEntity-a20582cd9bc74422a11fdf46c3996f6f",
"Policies": []
},
"ChildComponents": []
},
{
"@odata.type": "#Sitecore.Commerce.Plugin.Catalog.ItemVariationsComponent",
"Id": "efc538dc7303482694e500cd9a642a2c",
"Name": "",
"Comments": "",
"Policies": [],
"ChildComponents": [
{
"@odata.type": "#Sitecore.Commerce.Plugin.Catalog.ItemVariationComponent",
"Id": "56042064",
"Name": "Studio X Over-the-Ear Wired Headphones",
"Comments": "",
"Policies": [
{
"@odata.type": "#Sitecore.Commerce.Plugin.Pricing.ListPricingPolicy",
"PolicyId": "4d8bd6a11ec2405394422811db3beebc",
"Models": [],
"Prices": [
{
"CurrencyCode": "USD",
"Amount": 49.5
}
]
}
],
"DisplayName": "Studio X Over-the-Ear Wired Headphones",
"Description": "",
"ListPrice": null,
"Tags": [
{
"Name": "over-the-ear",
"Policies": [],
"Excluded": false
},
{
"Name": "headphones",
"Policies": [],
"Excluded": false
},
{
"Name": "studiox",
"Policies": [],
"Excluded": false
},
{
"Name": "wired",
"Policies": [],
"Excluded": false
}
],
"Disabled": false,
"ChildComponents": [
{
"@odata.type": "#Sitecore.Commerce.Plugin.Catalog.ImagesComponent",
"Id": "c13007d97cf54c46b98d4a2ba34e6fc5",
"Name": "",
"Comments": "",
"Policies": [],
"Images": [
"d2d12d06-341d-4ee8-b93e-fd6a963ff74f",
"bb5ca39d-2b41-452d-9bf4-e867adcaed8c",
"a2785fc9-0bd7-493d-ae2c-10ea5d55a3cd",
"2627453a-63d4-4907-9d62-aa9b902b9575"
]
},
{
"@odata.type": "#Sitecore.Commerce.Plugin.Inventory.InventoryComponent",
"Id": "ac79eaf75eb64c52b3255b46b19c0444",
"Name": "",
"Comments": "",
"Policies": [],
"InventoryAssociations": [
{
"Name": "",
"Policies": [],
"InventoryInformation": {
"Name": "",
"EntityTarget": "Entity-InventoryInformation-Habitat_Inventory-6042064-56042064",
"Policies": []
},
"InventorySet": {
"Name": "",
"EntityTarget": "Entity-InventorySet-Habitat_Inventory",
"Policies": []
}
}
]
}
]
}
]
},
{
"@odata.type": "#Sitecore.Commerce.Plugin.ManagedLists.ListMembershipsComponent",
"Id": "4dc2793e255e4d2c987f6ec776e410cf",
"Name": "",
"Comments": "",
"Policies": [],
"Memberships": [
"SellableItems",
"CatalogItems"
],
"ChildComponents": []
},
{
"@odata.type": "#Sitecore.Commerce.Plugin.Workflow.WorkflowComponent",
"Id": "b8ed544dd8de4b7a87a1ea2923db8fef",
"Name": "",
"Comments": "",
"Policies": [],
"Workflow": {
"Name": "DefaultCommerceWorkflow",
"EntityTarget": "Entity-Workflow-DefaultCommerceWorkflow",
"Policies": []
},
"CurrentState": "Draft",
"ChildComponents": []
},
{
"@odata.type": "#Sitecore.Commerce.Plugin.Views.EntityViewComponent",
"Id": "4b63bca302f9448cbab76cf1a9592379",
"Name": "",
"Comments": "",
"Policies": [],
"View": {
"Name": "",
"Policies": [],
"DisplayName": "",
"EntityId": "",
"EntityVersion": 1,
"Action": "",
"ItemId": "",
"Properties": [],
"ChildViews": [
{
"@odata.type": "#Sitecore.Commerce.EntityViews.EntityView",
"Name": "Test",
"Policies": [],
"DisplayName": "Test",
"EntityId": "Entity-SellableItem-6042064",
"EntityVersion": 1,
"Action": "",
"ItemId": "Composer-d536d25ed0aa4346b1663c9912f409d0",
"Properties": [],
"ChildViews": [],
"DisplayRank": 0,
"UiHint": "Flat",
"Icon": "piece"
}
],
"DisplayRank": 500,
"UiHint": "Flat",
"Icon": "chart_column_stacked"
},
"ChildComponents": []
},
{
"@odata.type": "#Sitecore.Commerce.Plugin.Catalog.ItemSpecificationsComponent",
"Id": "6a4c624247144da0b4fc51570bb5ee0b",
"Name": "",
"Comments": "",
"Policies": [],
"AreaServed": {
"Name": "",
"Policies": [],
"TimeZone": "",
"Longitude": "",
"Latitude": "",
"Region": "California",
"AreaCode": "",
"MetroCode": "",
"City": "Gilau",
"PostalCode": "407310",
"BusinessName": "",
"DnsAddress": "",
"IpAddress": "",
"IspName": ""
},
"Weight": 0,
"WeightUnitOfMeasure": "",
"Length": 0,
"Width": 0,
"Height": 0,
"DimensionsUnitOfMeasure": "",
"SizeOnDisk": 0,
"SizeOnDiskUnitOfMeasure": "",
"ChildComponents": []
},
{
"@odata.type": "#Sitecore.Commerce.Plugin.Catalog.DisplayPropertiesComponent",
"Id": "756f6b7aa16f4611ac9c224089bbbcc0",
"Name": "",
"Comments": "",
"Policies": [],
"DisambiguatingDescription": "",
"DisplayOnSite": true,
"DisplayInProductList": false,
"Color": "",
"Size": "",
"Style": "",
"ChildComponents": []
},
{
"@odata.type": "#Sitecore.Commerce.Plugin.EntityVersions.EntityVersionsComponent",
"Id": "c648775d683c4780b8f53c784d2e9eed",
"Name": "",
"Comments": "",
"Policies": [],
"EntityVersions": [
{
"Name": "",
"Policies": [],
"Version": 2
},
{
"Name": "",
"Policies": [],
"Version": 1
}
],
"ChildComponents": []
},
{
"@odata.type": "#Sitecore.Commerce.Plugin.Catalog.RelationshipsComponent",
"Id": "436e841726fb497d852c9d679286426a",
"Name": "",
"Comments": "",
"Policies": [],
"Relationships": [
{
"Name": "TrainingSellableItemToSellableItem",
"Policies": [],
"RelationshipList": []
},
{
"Name": "WarrantySellableItemToSellableItem",
"Policies": [],
"RelationshipList": []
},
{
"Name": "InstallationSellableItemToSellableItem",
"Policies": [],
"RelationshipList": []
},
{
"Name": "RelatedSellableItemToSellableItem",
"Policies": [],
"RelationshipList": [
"92a7d2cc-91ad-5223-26ba-cb88c8612c71",
"50bcae09-fd1b-4d94-10eb-f91d7667d77d",
"b8608a92-c842-110a-efdf-d2d8376ce7cd",
"1298810a-459d-88a3-c786-64e7d36e58cc",
"507f8ed2-ce2d-f426-b211-6033f291bf62",
"8fd88e39-5060-b596-dd58-662f127e9c50",
"ab0b7d24-e450-9629-d5ba-e1606d2857bc",
"428b5292-0ff7-732d-9dfc-b547aa435aba",
"73ad9c55-def7-c1ff-5efc-cb3e9c74d101",
"16eaf2e1-9daa-b7a9-835f-51358e72058b"
]
}
],
"ChildComponents": []
}
]
}

view raw

EntityJson

hosted with ❤ by GitHub

3. Add the Computed Field in the Configuration:


<configuration xmlns:patch="http://www.sitecore.net/xmlconfig/&quot; xmlns:search="http://www.sitecore.net/xmlconfig/search/&quot; xmlns:role="http://www.sitecore.net/xmlconfig/role/"&gt;
<sitecore role:require="Standalone or ContentDelivery or ContentManagement" search:require="solr">
<contentSearch>
<indexConfigurations>
<defaultSolrIndexConfiguration type="Sitecore.ContentSearch.SolrProvider.SolrIndexConfiguration, Sitecore.ContentSearch.SolrProvider">
<fieldMap type="Sitecore.ContentSearch.SolrProvider.SolrFieldMap, Sitecore.ContentSearch.SolrProvider">
<fieldNames hint="raw:AddFieldByFieldName">
<field fieldName="examplefield" storageType="YES" indexType="UN_TOKENIZED" vectorType="NO" boost="1f" returnType="text" settingType="Sitecore.ContentSearch.SolrProvider.SolrSearchFieldConfiguration, Sitecore.ContentSearch.SolrProvider"/>
</fieldNames>
</fieldMap>
<documentOptions type="Sitecore.ContentSearch.SolrProvider.SolrDocumentBuilderOptions, Sitecore.ContentSearch.SolrProvider">
<fields hint="raw:AddComputedIndexField">
<field fieldName="examplefield" returnType="text">Sitecore.CommerceDemo.Indexing.CommerceComputedIndexFields.ExampleComputedIndexField, Sitecore.CommerceDemo.Indexing</field>
</fields>
</documentOptions>
</defaultSolrIndexConfiguration>
</indexConfigurations>
</contentSearch>
</sitecore>
</configuration>